Photo by Piotr Miazga on Unsplash
The following text is an abridged and edited transcript of the video that follows at the end of this post. Time codes are provided in the below text to help you follow along in the video.
I want to share with you how I think about web scraping, the process of extracting large amounts of data from websites. I’ll admit, when I first learned how to scrape pages off the internet, it was very confusing. There didn’t seem to be much logic or reason to it — two characteristics that are very near and dear to my scientist heart.
However, as I learned more about the structure of HTML pages and beefed up my Python skills, things started to click. Now when I have to scrape a webpage, I use the same process — one I’d like to share with you.
But before I do that, I want to point out how important it is to know what question you’re trying to answer before you begin web scraping. If you don’t know your question, how will you know the answer when you see it? So make sure you have that question in mind before you begin.
The ABCs of HTML
Since you’re reading this blog, I can assume that you know that webpages all contain content. Those of us with a little more tech knowledge about how sites are created know that these webpages are created using HTML, a coding language in which content is inserted between tags. If we want to make text bold, we use bold tags. For example:
<b>This is bold text.</b> This is not.
And then that text is rendered on a webpage as:
This is bold text. This is not.
Simple enough, right? Things get a bit trickier when you learn that these tags can be nested, like so many HTML matryoshka dolls. So if you want your content to be both bold and italic, your code might look something like this:
<b>This is bold text. <i>This is bold and italic text.</i></b> This is plain text.
Which renders as:
This is bold text. This is bold and italic text. This is plain text.
The fact that tags can be nested is key to finding a starting point for scraping the page.
Super-Duper Soup and Jupyter Notebook
Beautiful Soup is a package that allows you to search for HTML tags within code and then return the values between the tags in the form of a list. For data nerds, it’s a little bowl of heaven. You can search very specific parameters of a webpage to get just the information that you want. (You can find Beautiful Soup documentation here.)
But first you need to know what you’re looking for. To do so, you need a little knowledge about HTML and how Google Chrome Inspector works so that you can find the HTML code related to the piece of content that you want.
Because the code for a webpage may change often, web-scraping scripts are fragile: You can build the Best Script Ever only to have it rendered useless when the code to a page is updated. For this reason, web-scraping scripts need to be developed as close to possible to when they will actually be used.
The scraping process itself is very analytical and requires a lot of trial and error to get what you need. You need to look at the webpage code and decide what tool will allow you to extract the data you’re looking for. That’s where Jupyter Notebook comes into play. The open-source web application allows you to iterate through the process to eventually get the data you need.
With both of these tools in hand, you’ll still need to test and debug on the fly. That’s just the nature of web scraping. Once you’re done, make sure to store the data in a database or CSV file because, as I said, the handy-dandy script that just extracted all that data might not work on the same webpage next week — or even tomorrow.
Yo Quiero Taco Bell Reviews
Now that we’ve covered those basics, let’s pick a page to scrape. I chose to scrape some Yelp reviews of Taco Bell because, well, who doesn’t like Taco Bell? I’m only going to scrape the reviews off this one page. If we want to scrape all the reviews, we’d have to change the structure of the HTML in the script or use a tool like Splinter to iterate through the pages. But for the purposes of this lesson, we’ll just scrape the first review page for this Taco Bell location.
[6:59] The data we’re extracting is the review itself and the number of stars for that review. To do so, we’ll first use Google Chrome Inspector to view the code. If this is your first time using Inspector, you might feel overwhelmed. But here’s what’s neat: You go to the live page, highlight the text you want to extract, then open Inspector and voilà! You can see where in the HTML code that is. In this case, the review text I’ve selected is between <p> tags.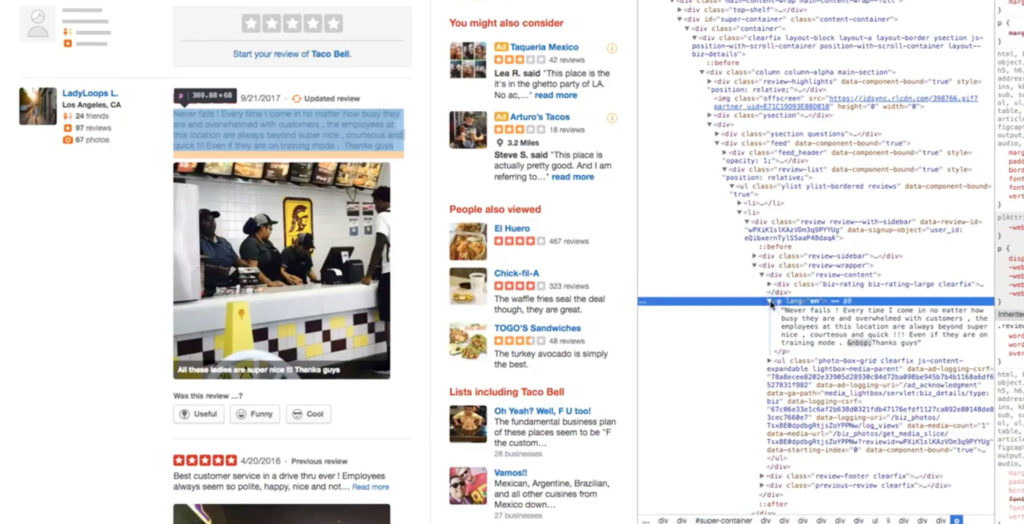
As you move up and down the code in Inspector, you can see the related live-site content on the left highlighted. What we’re trying to discern is whether there’s a single tag that contains all of the information we’re looking to scrape and, if so, does that tag also contain information we don’t necessarily want?
[8:10] When I select the <div class=”review-sidebar”>, I can see that it highlights the review from LadyLoops L. And if I go to <div class=”review-wrapper”>, the review is highlighted, but if I go to <div class=”review-content”>, it contains the review plus the star rating — which are the two pieces of information I want.
It’s always a good idea to inspect another part of the page to see that you correctly understand the structure, so I’m going to jump to another review. So after scrolling down in Inspector, I come to another <p> tag and can see the related text on the left highlighted. And if I choose the <div class=”review-content”> tag, you can see the review on the left has both the text and the star rating.
At this point, I’m going to assume that <div class=”review-content”> contains all the information I want for the scraping job. I’m also going to make an educated guess that this tag contains other information as well, but that’s okay.
From Website to Jupyter to Soup
Let’s open up Jupyter Notebook, copy the Yelp link and paste it in, and type the following:
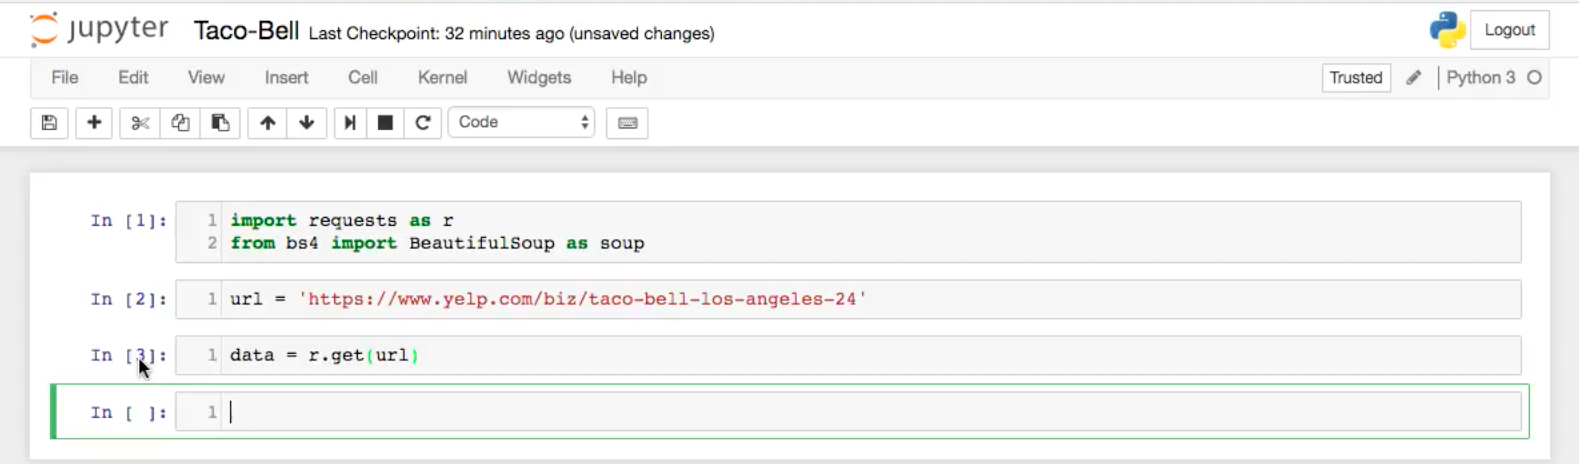
This is the usual way to download data using request, which you then need to verify. The best way to do this is to look at the data and see what you get. So I type the following:
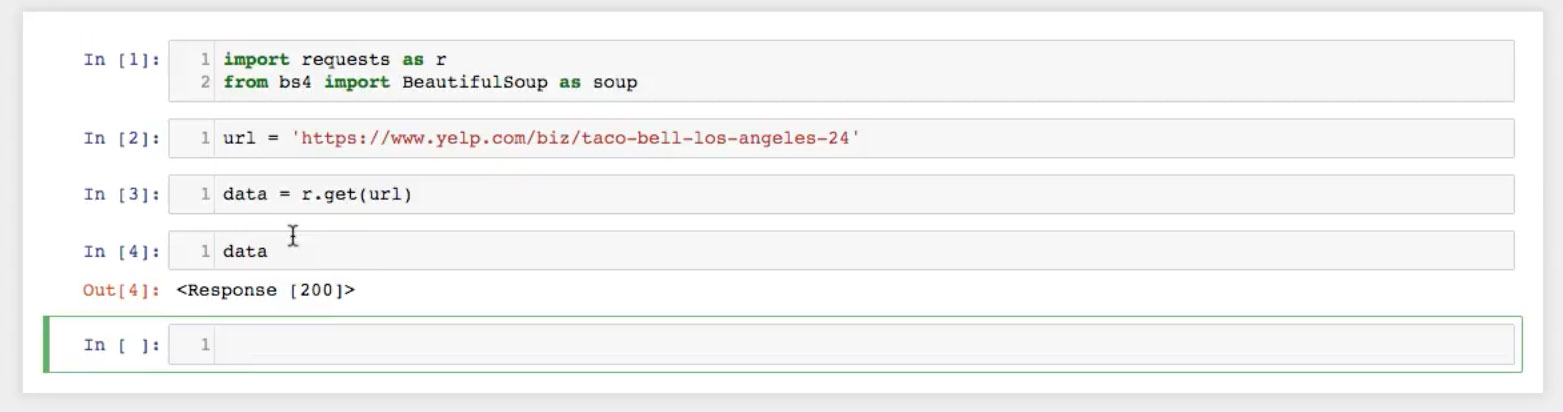
This returns Response [200], which means the script made a request to the server for the URL and then the server successfully responded back with the data. It’s very important to check that the script is working because you don’t want to continue only to find out that you were unsuccessful at making the connection in the first place.
Next we type the following:
This feeds the data into Beautiful Soup using an HTML parser, although sometimes LXML parser also works. This line of code is taking the data it got back from this get request and storing that in this Beautiful Soup object. Let’s see what the data looks like.

[12:45] It looks like a mess — a veritable bowl of alphabet “soup.”
This is really hard to read, but it doesn’t matter because we know what tag we’re going after.
Casting a Wide Net
Now that we have the data stored in a variable called page data, we want to find all the information within the tag that we selected, <div class=”review-content”>.
To do this, we’re going to go fishing by casting a net far and wide to get all of the information on the webpage that is inside that tag. To do so, we type:![]()
This command returns all the information that is a child of <div class=”review-content”> and stores each occurrence in a list. That’s important to know because we’re going to have to iterate through this list later to get what we want.
Let’s take a moment to check in on how we’re doing. The code shows the following, which includes a line that says, “Never fails ! Every time I come in no matter how busy they are and overwhelmed with customers , the employees at this location are always super nice…”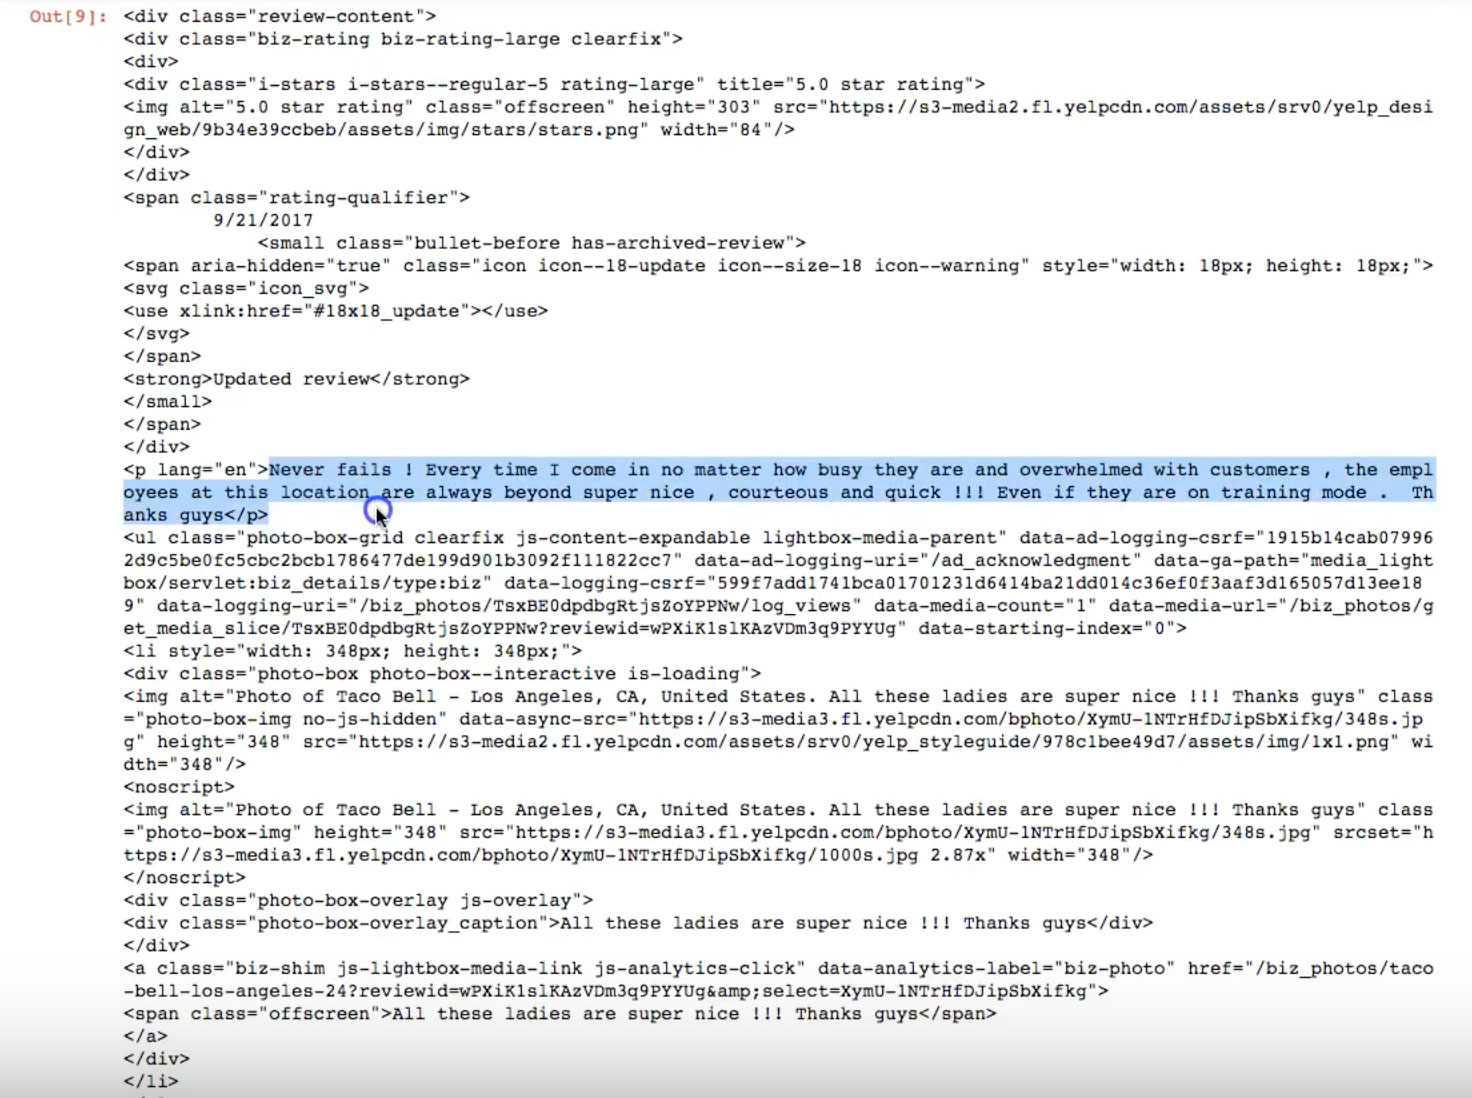
So let’s see if that is the first review on the live site:

Yes! This verifies that our assumption is correct, that by finding all the instances of <div class=”review-content”>, we got the information that we wanted (in addition to more stuff).
You always want to approach the first step by returning far more than just the information you want. It’s better to have more and then pare back as opposed to having less, because you won’t be able to grab more later. So use find_all to cast your net far and wide.
Saving Your Work
We’ve done a lot of work, so we want to make sure we don’t lose it. We can do that by storing the data we captured with the following command:
Now let’s go after the review, which, if you remember, was in a <P> tag that was a child within <div class=”review-content”>. So we can then type the following command:
This returns the review — which is what we want. The difference here is that I’ve used find, not find all. When you use just find, you’re looking in that fishing net you cast for the occurrence of the <P> tag within this entry. We can test this by manually traversing it, or looking at only one of the elements of the object. Here’s what it looks like if you want to look at the second one:
That gives this result: “I love Taco Bell and not afraid to say it,” which is the second review on the live site.
Now that we’ve shown we can iterate each review, I’m going to go back to zero (the first review, because Python uses a zero index), for the sake of simplicity and organization. I’m now looking for the star rating, which is in the alt attribute. In Jupyter Notebook, I can see that the alt attribute says, “Five stars.” Let’s find the image and then, within that image, let’s try to find the alt attribute. Here’s the command and the result:
[20:23] Great! We’re in the right area.
Using the Split Command and Iterating Through the Soup
That’s all well and good, but what if we don’t want all the other data in here and just want the numerical value for the five-star rating? In other words, we don’t want the text, just the number. To do that, we could split the data based on the spaces it contains. In this case, which has two spaces, there would be three data items: the number 5.0, the word “star,” and the word “rating.” If we do that for the first object in the list (object 0), then we get an output of “5.0.”
Up until this point, we’ve written short snippets of code to get the information that we want for each entry based on all of this “data soup.” But we’ve only returned the first entry. If we want to return all the entries, we have to reiterate through each value of this soup data object to generate a list. We can do that by generating a for-loop to iterate through each entry.
Now that we have a way to get the data, we need to think about how we want to store the data. I like to store data as comma-separated values (CSVs) because they’re simple to use and can be passed into a Pandas’ DataFrame. To do that, I’m going to store the items that we found in a DataFrame and then store the DataFrame as a CSV. Here’s our workflow:
To do this, we use the following commands:

We need to import Pandas as pd and create an empty DataFrame. Now, we need to iterate through this soup data object with a for loop for each entry:
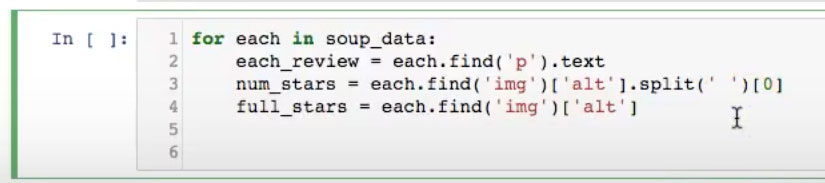
Now we want to store this in a list and then send it a dictionary. I also want to create three columns on my DataFrame: review, to hold the text reviews; star_number, or the numerical value of the star rating, and full_rating, which should be the text string of the full rating.
[27:38] We’ve now iterated through and stored everything in this DataFrame called DF. Let’s take a look at it: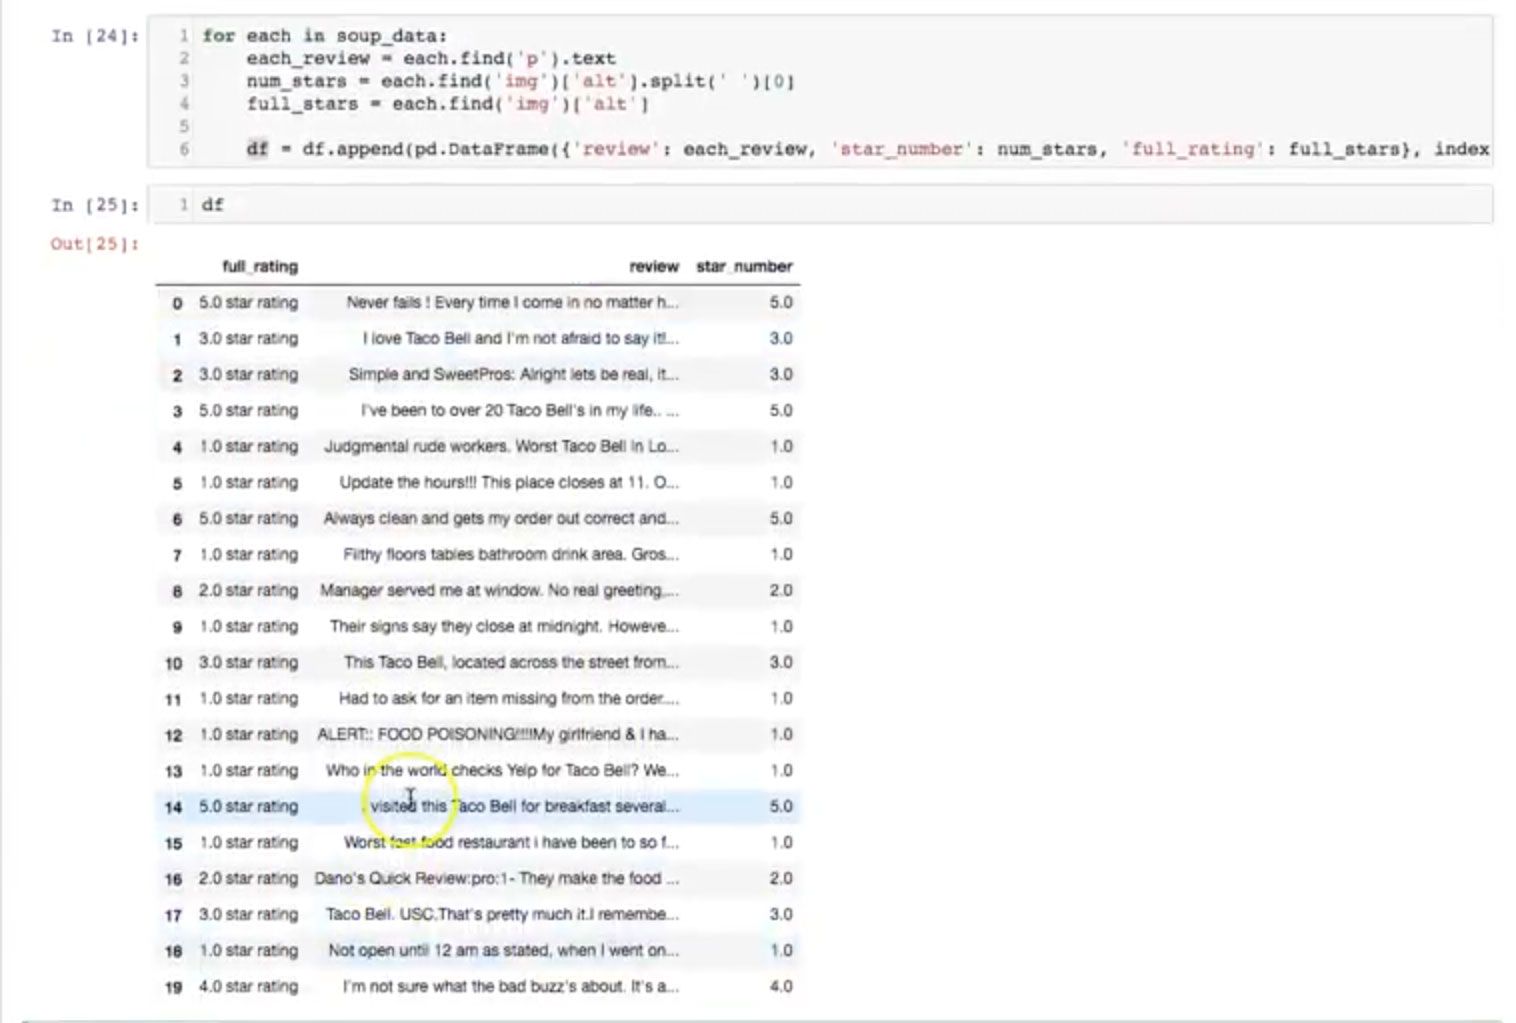
There it is! Every Yelp page has 20 reviews — and that’s what we have here. And it’s exactly what we wanted: star number, review, and full rating.
Let’s look at just the tenth review, which we do by typing the following:
So that shows that we’ve got everything that we want.
Saving Your Work as a CSV File
Now that we’ve done all this work, let’s make sure we don’t lose it. We can save it as a CSV with this command:

Now we need to find the CSV file, which was saved in the root of the notebook I’m running, and open it up. Here’s a link to the file on Github.
So now we have a copy of we’ve done and if we want, we can load it back into Pandas at a later time.
Recap
This is the way I approach web scraping, which you can see is a trial-and-error process. There are two points worth repeating:
- When you’re looking through the HTML, you want to use Inspector to find the tag with the information that you want and then some. In this case, it was <div class=”review-content”>.
- Once you know what tag you’re looking for, you go fishing for that tag using find_all in Beautiful Soup. That command returns all the data in the <div class=”review-content”> tag. I only used find_all once because I cast my net only one time. Every subsequent time that I traversed down, I used “find” because I was looking into the net of soup data that originated from find_all for specific tags. Everything is stored in soup data using find_all, but then I used find to look for the <p> tag. When I was looking for the star rating, I found image using find. To me, that was the most confusing part about web scraping, but once I looked at the process as a net metaphor, it finally made sense.
You can review the code and related files in my Github repository.
If you have any questions, I’m happy to discuss! Just leave a comment below or shoot me a message.